By Jane, AKA
Mumsy

 Artificial incubation of chicken
eggs is nothing new. Since earliest history keeping there are accounts on how
this was accomplished. From the earliest Egyptians as recorded by Aristotle in
400 BC. Those incubators were made of mud brick and look like enormous kilns.
The exactness of the eggs temperature was tested by holding the egg to the eye
lid. This skill is so precise it is still practiced and handed down through
generations. These methods and kilns are still used to this day. I have read
that hatch rate is very often 80%! Not bad. Not bad at all.
Artificial incubation of chicken
eggs is nothing new. Since earliest history keeping there are accounts on how
this was accomplished. From the earliest Egyptians as recorded by Aristotle in
400 BC. Those incubators were made of mud brick and look like enormous kilns.
The exactness of the eggs temperature was tested by holding the egg to the eye
lid. This skill is so precise it is still practiced and handed down through
generations. These methods and kilns are still used to this day. I have read
that hatch rate is very often 80%! Not bad. Not bad at all.Since mankind started domesticating poultry, it became apparent waiting for a broody to get in the mood wasn't going to supply enough eggs and chickens for a growing population year round. Incubation has gotten a bit easier for us in this day and time. With so many more folks wanting to hatch just a few eggs or hundreds, electricity and finely calibrated thermometers and hygrometers helps a lot. Then why is it so difficult with some incubation methods and incubators?
This article is about the way I go about it using an inexpensive Little Giant Styrofoam incubator. It could hold forty eggs with an automatic turner but I don't need that many chicks for my home use. I usually set half that amount or less.
First things first. Setting it up in place where there is no forced heat source from my electric heater. If I had a choice it wouldn't be near a door that is opening and closing to the outside as well. To cut down on drafts the incubator is set into the bottom portion of the card board box it came in.
I also poke extra holes evenly distributed on the top of the incubator. Being careful to make them the same size. The extra ventilation is a good thing. This is done before setting eggs.
For me keeping written records comes naturally. No worries about second guessing age of eggs, who laid what, when to turn the eggs, and all the other little details that will help me with future hatches.
I collect eggs for hatching as soon as I can. Warm from the hen is my favorite. I keep all nest boxes clean. If there may be a small poop spot, I clean it off gently with an emery board. If it doesn't sand off easily, I don't put it in my incubator.
The eggs go immediately into my house into a dark cool closet. This is where writing the date collected on the egg becomes important. During candling and hatch, I can tell at a glance how old each egg is. If an egg becomes a quitter, that date on that egg goes into my notebook. Good way to know if I'm setting eggs that are too old.
I keep a thermometer/hygrometer
next to the egg carton. It has to read 58 to 60 degrees with 30% humidity
reliably before I store the eggs. A dark +00
wax crayon is attached to the
carton with a ribbon. I mark each egg at the large end with the initials of the
hen (I would use breed or color if applicable) the date I collected it and an X
and O on each side. I can't read pencil through my incubators window and I
don't like the idea of ink or other unknown marker on my porous egg shell. Wax
crayons are harmless and I can and have used different colors for different
hens or breeds.
Two days before I have my batch of eggs collected, the incubator is plugged in and I put all my necessary items inside it. This is the most important time for me. Once eggs go in, the last thing I want to be fooling around with is temp/humidity readings and whether I forgot to add something.
Two days before I have my batch of eggs collected, the incubator is plugged in and I put all my necessary items inside it. This is the most important time for me. Once eggs go in, the last thing I want to be fooling around with is temp/humidity readings and whether I forgot to add something.
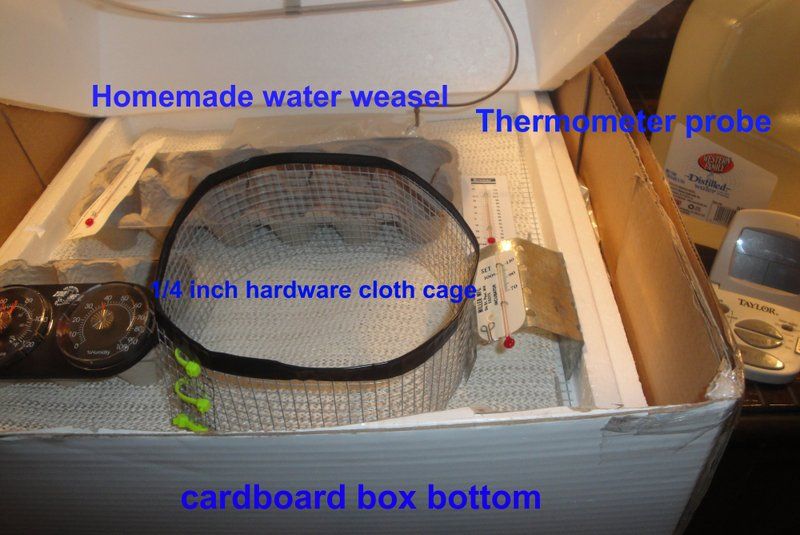
The inside of my incubator looks crammed. Well... It is! But everything has a reason or purpose. To help keep the temperature steady or keep eggs separate at hatch. This is what I use and why.
Five thermometers. One has a hygrometer. It is the best I could afford in a pet store with the reptile cage supplies. The next best is the meat probe thermometer. I keep the probe inside my homemade water weasel for accurate inside egg temp reading.
The water weasel is nothing more than a vacuum sealed bag full of water. I used a hot glue gun to double it over itself. Hot glue, plastic bag, water, and bare fingers are tricky together. If you make this, be very careful or you will burn a hole in the bag, burn your fingers and generally have a painful mess. Don't ask how I know this.

The glass jam jars with tightly fitting plastic lids are heat sinks. I may try filling them with clean stones someday. Water works. I have not had big dips in temperatures with this set up. The filled water jars help with that, as does that bag of water with my probe.

The 1/4 hardware cloth cage is held together with zip ties and I used electrical tape on the sharp edge. This goes in at lock down. When progeny testing chicks, this cage keeps babies from mixing together.

The shelf liner is disposable. I like it on top of the wire bottom in the incubator. After hatching I take it out and toss it. Keeps a lot of the mess off the wire.

My current set of eggs is on dry hatch. No water in the well channels. I live in the Pacific North West. It's wet here. A lot of the time. My humidity reading is holding steady at 33%.
At lock down, a few small sterile sponges will be lightly wet with warm distilled water and added in the corners of the incubator. This will bump humidity to 50% to 66%. Hatches with higher humidity than this have been disastrous in previous attempts for me. I get chicks to hatch but not full batches.

 Humidity too high = too large chicks that drown in the shell before or after
piping. No room inside the shell for all that chick and all the liquid. It's a
sad end to other wise good development, and one I do not want to ever repeat.
Humidity too high = too large chicks that drown in the shell before or after
piping. No room inside the shell for all that chick and all the liquid. It's a
sad end to other wise good development, and one I do not want to ever repeat.When everything inside the incubator is set up and the temp is reading 100 degrees on at least four of five thermometers, the humidity is holding at 30 to 33% for at least 24 hours... Then I place the eggs inside.
The easiest way to calibrate a bunch of thermometers is set them together on a table in the room with your home thermostat. If they all read the same, you’re good to go. Some say to dip them in ice water until they all read 32 degrees. I haven't tried that.
Two thermometers are placed on the floor of the ‘bator on either side of the eggs. Two are set at egg level either side. The probe in the water weasel is set top egg level. When I turn my eggs, they are moved around the ‘bator. No egg sits more than six hours in the same spot.
 The first set will be eggs in the upright position. I don't open the incubator
or turn the eggs for the first 24 hours.
The first set will be eggs in the upright position. I don't open the incubator
or turn the eggs for the first 24 hours.In my notebook and on my calendar kept next to the incubator, I mark the day set. Each time I turn the eggs, I mark my notebook to which side (“X” or “O”) and the time. This is not something to worry over much, as long as they are turned at least a few times a day. It only takes me a minute to hand turn thirteen eggs. I keep a damp sponge in a cup next to the ‘bator and moisten the tips of my fingers before turning. Marking in my notebook gives me something to do. It beats staring at eggs through that little window. Yes. I have been known to stare at eggs. I should be sweeping the floor and dusting the china but staring at eggs for twenty-one days seems to be what I do best.

 I mark on my calendar when to candle on the seventh day, fourteenth day, and
eighteenth day. I just candle the three times. I
take out half the eggs. Close the lid. Do the candle. Replace those eggs and
take out the other half. It's after candling that takes the longest for the
inside ‘bator temperature to come back up. I NEVER touch that adjuster if I can
at all help it! The temp will come back up. Just walk away and try not to look
for at least an hour. Here is where that probe thermometer and water weasel
come in really handy. In my set up it has never dropped below 98 degrees after
candling. The other thermometers may take a little while to come back up but
that probe tells me the inside temp of the eggs is holding steady and safe. It
takes a lot of worry a way. I lock down the incubator on the eighteenth day after
one last good look at the eggs.
I mark on my calendar when to candle on the seventh day, fourteenth day, and
eighteenth day. I just candle the three times. I
take out half the eggs. Close the lid. Do the candle. Replace those eggs and
take out the other half. It's after candling that takes the longest for the
inside ‘bator temperature to come back up. I NEVER touch that adjuster if I can
at all help it! The temp will come back up. Just walk away and try not to look
for at least an hour. Here is where that probe thermometer and water weasel
come in really handy. In my set up it has never dropped below 98 degrees after
candling. The other thermometers may take a little while to come back up but
that probe tells me the inside temp of the eggs is holding steady and safe. It
takes a lot of worry a way. I lock down the incubator on the eighteenth day after
one last good look at the eggs. When that probe thermometer in the water weasel dips too low, that's when I pay
attention. I will turn the room thermostat up a notch. I'll turn on an over
head light above the incubator. But... I never touch that adjustment knob.
When that probe thermometer in the water weasel dips too low, that's when I pay
attention. I will turn the room thermostat up a notch. I'll turn on an over
head light above the incubator. But... I never touch that adjustment knob.My candler is the brightest LED flashlight I could find at the local hardware store. Works great! But it has lots of other weird and alarming settings that nearly blinded me the first time I used it in the dark water closet. Flashing red lights and strobe beacons startled me good! Good thing I was sitting down!
There are many types and brands of incubators available. Some are truly excellent. Little is needed to attend them once they are set with eggs.
This article is geared to those folk like me. Hands on, attentive to details, and want to save a little money and not worry so much.
Artificially incubating eggs with cheapo set ups is fun. Especially when you get those details right. Things can and do go wrong but that's life. Happy hatching!
Cheers!
Mumsy
Leigh Says:
As a side note, on
Mumsy’s advice, I have modified my own Little Giant incubator and am having
far, far better results than my last attempt at incubating! No more 3 degree
temperature swings and so much less worry!
*
Thanks for the very detailed post! Great for those of us that want to try it....everything is spelled out like "LG Hatching for Dummies"!!!
ReplyDeleteI have a couple questions:
-On the water weasel: how do you keep it from leaking? If I understand correctly, the temperature probe is inserted into the water in the plastic bag. Do you seal the hole it goes into somehow?
-You stated "I also poke extra holes evenly distributed on the top of the incubator." Is that in the cardboard box that the incubator is sitting in or is it in the incubator itself?
Thanks again!!!
LM
Hell LM,
ReplyDeleteGood questions. I have a Food Saver vacuum sealer. The 8" heat & seal bag is sealed on both ends. An easier way would be to use zip lock freezer bags. Put one inside the other to make sure there will be no leaks. Basically you don't want too much water in the bag or you won't be able to double it over and seal the end with the glue gun. You need one end open for the probe to easily slip inside. If I lived near a big toy store, I'd just have bought a water weasel toy. They are only a couple bucks. Downside to living on an island. No toy store within 50 miles.
I poke the extra holes on the top lid of the styrofoam incubator. Down both sides on the outside edge of the windows. Being very careful not to poke into the heating element.
Cheers
Jane aka Mumsy
Thanks!
DeleteGreat article! Makes me want to get my own set up, but my DH might kick me out. Lol
ReplyDeleteJudy
Did you poked the extra holes in the top for air flow since you have it in a box and air can't circulate through the bottom? I actually put mine on little coasters to raise it up for better air flow at lock down.
ReplyDeleteVicki(delisha)
Vicki,
DeleteYes I did do it for added ventilation but also for more options on syringing water onto sponges or inserting the probe thermometer for readings in every corner of the incubator.
Jane
Love the hardware wire basket idea. Will try that in my own incubator.
ReplyDeleteMichele aka mstricer
DeleteMichele,
Well...It seemed like a good idea at the time. Only one egg in the basket cage pipped and hatched. Two rambunctious chicks that hatched first managed to climb on top of the water filled jars and jumped or fell into the cage! I laughed when I found them in there. I think it would work better for bantam chicks. Or maybe if there were fewer things for them to climb on.
Jane
Thank you to everyone that said such kind things about my article.
ReplyDeleteFinal hatch was excellent. I had 100% hatch on seven Phoebe chicks and one Edith chick out of four. Eggtopsies revealed the three unhatched eggs were quitters at week seven. I could only see dark mass during candling and the float test was inconclusive on them. I'm fortunate they didn't explode! All in all, I will use these same tips and tricks again with my LG.
I have a question about turning the eggs. It seems as though you have the eggs in a carton. I am not sure how to 'turn' the eggs in the carton. Do you just slightly lean them from one side to the other for the turn? I have just put some eggs in my incubator. It is thanks to Mumsy's article that I have found the will to make the attempt. I have some bantam eggs that seem easy to move in the carton, but I also have some Marans eggs that seem to barely move when I lean them. Not sure if I am doing the right thing...
ReplyDeleteJust shift them gently from side to side as much as possible in an egg carton. If you have a small, wedge-shaped piece of wood, you could also tilt the whole carton gently by switching which side the wedge is on each time.
DeleteHope this helps -
Leigh
Thanks! Big help!
DeleteThanks for this article! Currently on Day 16 of my first hatch and came across this article before incubating, so I'm coming back to refresh myself before HATCH DAY! Started out with 28 eggs and am currently at around 21 or so, so I don't think that's too bad. Using a Little Giant with automatic turned.
ReplyDeleteThank you for the post. You wrote so carefully! I'm gonna try this tonight.
ReplyDeleteI have Foodsaver V2244 for homemade, the machine that cheap and very helpful. I don't have to worry about the way to keep food fresh any more. thank for your helpful tips.
ReplyDeleteYour post is very detail so even a person know nothing about Incubating can understand. Thanks. I really like your blog.
ReplyDeleteThe best Using Inexpensive Incubators has all the above mentioned qualities. You have really explained everything in detail and in a nice way. Thanks a bunch for sharing this great information. Keep up the good work.
ReplyDeleteHave you had good success keeping them at room temperature? How long did you have them before you incubated them?
ReplyDeleteLeigh here. I personally keep my hatching eggs at room temperature for up to 2 weeks before incubating and it has worked fine for me. Generally the eggs younger than 10 days old hatch best.
DeleteAwesome article, thanks for sharing this great information :)
ReplyDelete