Thursday, December 27, 2012

New York TImes Article - Farms Turn to Oregano

Good information is good information, and we at Natural Chicken Keeping believe that such information should be shared - even when it comes from another source.

We thought our readers would enjoy the following New York Times article (please click the title to be redirected directly to the source):

In Hopes of Healthier Chickens, 

Farms Turn to Oregano 


For more on Ropadiar for Poultry, click Here.

*

Wednesday, December 26, 2012

Easy Ways to Sprout Seeds for Your Chickens


By Sue


This Article Contains:
An Explanation of Why Someone Would Want to Sprout
An Explanation of the Difference Between Sprouting and Growing Grass (Fodder)
A Simple Sprouting Method
A Simple Method for Growing Grass (Fodder)
An Explanation of Why I Choose Sprouts Rather Than Grass (Fodder)


I wanted to share an EASY way to do sprouts in hopes it would give someone encouragement to try it as an excellent feed source for their chickens.

First a little Background Information

Why is sprouting a good idea?
The main reason folks sprout their seeds and grains is to make the nutrients in them more available for digestion.  Seeds and grains come with a "preservation system" that is designed to protect their stored proteins, fats and minerals over an extended period of time until conditions are right for germination and growth. This "preservation system" consists of items that are "antinutrients" when ingested. 

In simple terms, the chemistry involved keeps our bodies from being able to use several nutrients provided in the grains.  Antinutrients can also bind to nutrients in our intestinal tract that are from other food we eat and render them indigestible as well!  It's thought that these antinutrients help protect the seeds from pest infestation and/or ingestion by animals, keeping them from being devoured before they can germinate in the natural setting.  Grains and seeds can sometimes even pass though the digestive system intact, then are excreted in the feces due to this preservation system and are still be able to sprout and grow!  

The antinutrients found in grains and seeds include:
-Phytic Acid
-Enzyme Inhibitors
-Tannins
-Hard-to-Digest Proteins


Problems associated with ingesting these antinutrients include blocking calcium, magnesium, copper, iron and zinc in the intestinal tract leading to deficiencies in these essential minerals.  They can also cause stress to the pancreas, inhibition of digestion in general, allergies and digestive disorders.  

Sprouting or fermenting seeds and grains reduces or eliminates the antinutrient properties inherent in grains and increases bioavailability of many nutrients including B vitamins, vitamin C, folate, fiber, and essential amino acids such as lysine.   As the seeds sprout, enzymes that are needed to properly digest the proteins in the grains are produced making them available for our use.

See:
http://www.westonaprice.org/food-features/be-kind-to-your-grains 

http://www.wholegrainscouncil.org/whole-grains-101/sprouted-whole-grains

I prefer sprouting the whole grain seeds rather than adding them to the fermented feed as sprouting is a process that happens in nature, quickly breaking down the antinutrients, and producing the enzymes necessary for their digestion without the high acid content produced in fermentation.  I currently only use fermentation for feeds that contain ground grains or pellets that cannot be sprouted.

A second reason for sprouting is that it produces a greater amount of feed for our money.  Similar to fermenting feed (ff) it gives us a greater "bang for our buck", not only making the grains more useable nutritionally, but also resulting in reduction of feed and grain used partly due to increased volume created by sprouting and partly by increasing useable nutrients.  This is another great way to lower feed costs while at the same time producing a healthier flock from the same items you're already feeding!

Terminology
When discussing sprouting seeds and grains, it seems that there is a bit of confusion about some terms like "sprouts" and "fodder" (or sprouting to the grass stage).  

A "sprout" consists of a seed that is just beginning to grow a small root.  This is what I call the "short tail stage". 

 Photo:  Sunflower Seeds & Wheat Sprouted Together

Fodder is continuing to allow the sprouts to grow until they reach the "grass stage."  

Photo:  Wheat Sprouted to the "Grass Stage" - Also Referred to as "Fodder"

My Sprouting Method
So...on to my simple sprouting method!   This whole process takes less than a minute each time I attend to it.

For a small flock of birds, sprouts can be done right on your kitchen counter taking very little time or effort.  For the small flock, I use a stainless steel strainer and a large bowl.

1.  Put as many seeds you want to sprout into the strainer(s)
2.  Put the strainer(s) in the large bowl(s) and cover with water.  Let soak overnight.


Photo:  Sunflower Seeds Soaking

Photo:  Wheat Berries Soaking

3.  Drain off the water in the morning by lifting the strainer out of the bowl.  Dump out the water left in the bowl, then rinse the seeds by running water over them from the faucet and shake out the excess water into the sink.

4.  Put a canning jar ring in the bottom of the empty bowl and set the strainer with the seeds on top of it.  This lifts up the strainer and allows room for any moisture to drain from the strainer while keeping the seeds from sitting in the water below.  (If you don't have a jar ring, get creative and find something to use that you DO have!  The goal is to allow the strainer to drain without having the seeds sitting in water in the bottom of the bowl.)

Keep the bowl in an area where it won't receive direct sunlight.  Sometimes I just put a paper towel over the top to keep out excessive light.


5.  One or 2 times daily, lift the strainer out of the bowl and rinse under cold water from the faucet.  Then either toss the seeds around a bit in the strainer (like tossing a pizza dough) or give them a little stir with your hand and replace the strainer back in the bowl on the ring.  (The rinsing and tossing or stirring with your hand is important.  This will keep any molds from growing in your seeds.)
 
6. Repeat step 5 for 2-3 days (until short root tails appear on the seeds). 


Photo:  Wheat Sprouts


Photo:  Sunflower Sprouts


Photo:  Mixed Sunflower and Wheat Sprouts


7.  Feed by tossing on the ground.  Chickens are designed to peck and scratch for their food on the ground.  They love the treasure hunt!


A Few Sprout Notes:
-The strainers pictured came in a set from Bed Bath and Beyond http://www.bedbathandbeyond.com/product.asp?SKU=11508006  
You can use any strainer that you may already have with mesh that is small enough to contain the seeds.


-You can mix seeds together for sprouting if they sprout at similar rates.  Wheat and Sunflower seeds work well together. 

When Sprouting for a larger flock of birds you can use plastic food-grade 2, 3, or 5 gallon buckets that can often be obtained from the local supermarket bakery department free or a for small charge.  To make a straining bucket, drill holes about 1/2" apart in the sides and bottom that are small enough to contain the grains but large enough for the water to drain through easily.  Add seeds to the straining bucket.  For soaking, place the straining bucket down inside another regular bucket and cover the seeds with water.  After soaking overnight, lift the strainer bucket out, drain, empty water from bottom bucket and proceed the same as with the smaller scale strainer and bowl method, rinsing 1-2 times a day and tossing or stirring with your hand each time to prevent the sprouts from molding or matting together.

Growing "Fodder" - To the "Grass Stage"
Some people like to continue to grow their sprouts to the grass stage (also called fodder) to provide some grass during winter months or in situations in which their birds cannot free-range.  Fodder is very appropriate for ruminant animals but, in my opinion, should be fed carefully to chickens (which are not ruminants).  Ruminant animals are equipped with a multi-gastric digestive system that is conducive to digesting and using nutrients from green plants in a way that mono-gastric animals (including chickens and human beings) are not able to achieve.  When chickens graze fresh grass growing out on pasture they are able to nip off small pieces that can be easily handled in the crop.  These are eaten in addition to "animal proteins" (worms, bugs, snakes, toads, etc.) that are very important for their health.  If growing fodder, I feel it is important to keep the grass blades relatively short to avoid any digestive problems.

Sprouting is also very "fool-proof" when it comes to mold and root-rot issues which can quickly become a problem when growing to the grass stage, rendering them unfit to feed.

Since sprouting is so simple and quick, is easy-to-digest, and sprouting to the grass stage seems to offer very little extra nutritional benefit for chickens, I very seldom grow my sprouts into grass.  Occasionally, however, I put out a tray in the winter.

My "Grass Growing" (Fodder) Method For Small Flock:

1.  To grow the sprouts to the fodder stage, I simply follow all the steps for sprouting above adding another day or 2 until the rootlets are about 1/2" long.  (See notes below.)

2.  Pour sprouts into a flat container and spread to cover the bottom of the tray. The container shown in the photos was purchased at the local discount store for about $3. (If you're growing for a larger flock you can use larger containers, several smaller containers, plant growing flats, etc.  Again, get creative - you may already have something around the house that will work!)


Photo:  Transfer sprouts to growing tray.  

3.  Use a spray bottle to mist the sprouts several times a day as needed. Sprouts should feel damp when touched with the back of your hand.  The seeds will retain a good amount of moisture; be sure no water is pooling in the bottom of the tray as this will create conditions conducive to mold growth and root rot.  (With trays that have drainage holes, the excess moisture can drain out the bottom.  The plastic container shown does not have drain holes and works well but you could add holes if you want.)


4.  Repeat step 3 approximately 3-4 days until the grass is appropriate for feeding.  Note that the seeds will swell and a dense, thick root mat will form.
 

Photo:  Day 2 in tray.

Photo:  Day 2 in tray.


Photo:  Day 3 in tray.

Photo:  Day 4 in tray.

-Feed grass/fodder either by putting the whole tray out for the chickens or you can tear off pieces of the seed mat and feed smaller portions at a time.  The chickens will eat it all - grass, roots and seed.  My birds tend to go for the seeds and roots before eating the grass!  BE SURE THERE IS NOT MOLD OR ROT on the seed mat when feeding. 

Grass (Fodder) Notes:  

-When growing to the grass stage, I prefer to sprout using the strainers or buckets to the short root  stage before putting them into the trays for several reasons.  One is that during the initial sprouting stage there is a good amount of "starchy substance" that is being drained from the seeds in the rinsing process. That starchy substance can become a problem in the bottom of a growing tray by creating an environment conducive to mold growth and root rot.  This is true even if  you are using trays with drainage holes.  Another reason is that I may sprout a large batch for feeding right away and only remove a small portion for the growing tray(s).

-When growing grass (fodder) for larger flocks there are lots of ideas and methods that are much more labor and equipment intensive. I, personally, would likely not grow grass on a regular basis for a large flock unless I had ruminants that would also benefit from the grass.  I feel the increased benefits of fodder vs. sprouts is very little for chickens and feeding sprouts is much simpler at a larger scale without the concerns regarding mold, root rot, and no need to purchase special equipment.

Some Helpful Links:

Whole Grains Council on Sprouted Grains
http://www.wholegrainscouncil.org/whole-grains-101/sprouted-whole-grains


Weston A. Price Foundation:  Be Kind to Your Grains and They'll Be Kind to You
http://www.westonaprice.org/food-features/be-kind-to-your-grains


The Modern Homestead:  Sprouting to Enhance Poultry Feeds (Harvey Ussery)
http://www.themodernhomestead.us/article/Sprouting.html

Harvey Ussery shows how he uses multiple buckets to sprout for a larger flock of birds.

Backyard Chickens SproutingThread:  Anybody Raise Sprouts to Feed the Chickens
Be careful not to confuse "sprouting" with growing grasses or "fodder".  As stated above, there is a bit of confusion on those terms and posters on these threads carry out some of that confusion!
http://www.backyardchickens.com/t/425134/anybody-raise-sprouts-to-feed-the-chickens
Lots of different methods for sprouting shown. 

I found Kassaundra's bag sprouting method interesting -  shown here:  http://www.backyardchickens.com/t/425134/anybody-raise-sprouts-to-feed-the-chickens/390#post_9918936


Sprouting Bag/Method:
http://sproutpeople.org/supply/sprouters/hempbag.html


Backyard Chickens Fodder Thread:  Growing Fodder for Chickens
Be careful not to confuse "sprouting" with growing grasses or "fodder".  Folks posting on this thread in particular seem to use the word "sprouting" to describe growing grass/fodder.  This is an incorrect use of the term.
http://www.backyardchickens.com/t/713334/growing-fodder-for-chickens
This thread shows some very elaborate fodder growing systems.

An especially helpful post by PacaPride who grows fodder for his Alpacas here:  http://www.backyardchickens.com/t/713334/growing-fodder-for-chickens/760#post_10009623  Read any of his posts for good info on fodder.


Quartz Ridge Ranch Fodder Posts
http://quartzridgeranch.wordpress.com/?s=fodder&submit=Search
Some good photos and info. here.


There are LOTS of good links and references to see photos and methods listed throughout the 2 Backyard Chicken forums listed above.


Saturday, December 22, 2012

Guide to Feather Anatomy and Coloration


By: Karen - KI4GOT   (Visit Karen’s Farm Here)


I've seen a number of people who are new to poultry asking, "What is ______?" Fill in the blank with any color or feather type or part found on a chicken.  Hopefully this post will provide a good reference for all your future feather questions.

The FIRST thing I will recommend, if you want to breed any American Poultry Association recognized varieties of poultry, is to get a copy of the Standard of Perfection (SOP). Any edition will do as many of the breeds haven't changed in years, though newer volumes will have more recently added breed varieties. You can order the most recent edition directly from the American Poultry Association by clicking here. Many breed association websites will also go into detail for the various recognized varieties.

I'm not going into great depth here, just covering some of the basics. If you want to know more, you have the greatest research tool at your fingertips. It's called the Internet. Google is your friend. If you want to know something, type in what you're looking for and you'll find way more than what you wanted to know. LOL

First, the general parts of a chicken. This part is easy. I found the following image at: http://files.backyardchickens.com/graphics/chickenparts.gif and it does a pretty good job of showing all the anatomical terminology. When reading the Standard of Perfection for any breed, it will give specific descriptions of the important areas for each breed, variety and gender -  if there are differences between them. Some varieties will be the same for both sexes and noted as such (for example, solid colored birds).
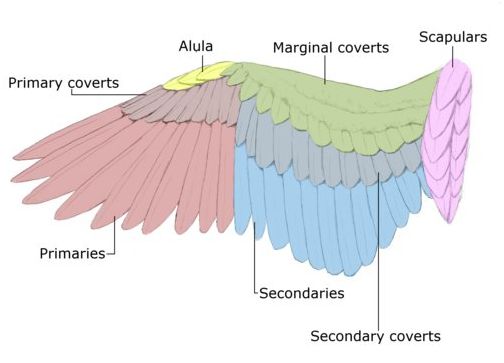

Next is a diagram showing the feather categories of a wing, found at http://theprophetandtheliar.tumblr.com/post/13458043137/chapter-03-animal-anatomy. This is a great place for some comparative anatomy between humans and some other animals, and I recommend it for anyone interested in knowing the similarities and differences. Some breeds will have color variations within these groups of feathers, so knowing which feathers you are looking for is important.

Now for the anatomy of a single feather.  I don't remember where the original version of this image came from, but it has been edited slightly with the more common names of the components.


And even more detail of a feather. All chickens have normally barbed feathers with the exception of Silkies. Silkies lack the barbules that hold the individual feather barbs together. When someone refers to a "hard feathered" or "soft feathered" bird, it is a reference to the stiffness of the shaft of the feather. The Old English Game Bantam is considered a "hard feathered" breed, where the feathers are held tightly to the body. A Cochin would be a "soft feathered" breed, having a much looser, rounded appearance.

The last thing I will mention here is color pattern. There seems to be a great deal of confusion among them as some breeds may refer to one or the other with different names. For example, Penciling. In Cochins, the Partridge variety is penciled. Some descriptions in the SOP also refer to stippling, which appears as a very small pattern of dots on the surface of a feather, similar to what you see at the base of the feather labeled "Mottling." This brings up another point. In some varieties, a Mottled bird has solid white feathers interspersed with colored feathers, rather than just tipped in white as shown below. The feather shown below, in my opinion, is more indicative of a Mille Fleur type pattern, where the base of the feather is a shade of buff, red, or brown, with a black chevron edging a white tip.

The SOP also mentions “Shafting” for some varieties. This is simply where the feather shaft is one color and the body (vane) of the feather is another. This is required for some varieties, and considered a fault for others. Again the SOP is a handy resource for knowing what is required for the breed you are working with, to give you an idea of what you are looking for.

The last thing I will mention here is how to use the SOP. So many people get hung up on the feathers and colors of a bird, that the basis of what MAKES that breed can get lost. When you read the SOP, the breed description appears in order of importance. First is the overall shape, size or weight of the bird. Next would be the head, feet, wings and tail. These details include tail angulations, number of points on a comb, how tightly the wings are carried, and number and placement of toes (most breeds have 4 toes but some have 5). The last thing described in the Standard is coloration. 

(Click to enlarge images representing different feather patterns)


Hope this was helpful. If only one person gets anything out of it, then my time was well spent in typing this up. And remember, "It costs less to raise the best." A quote from my mentor and advisor, Dr. Bob Hawes from the University of Maine in Orono. I blame him for my love of poultry, and Cochins in particular. Thanks Dr Hawes.


Karen


*